How to Conduct a Prescribed Burn for Upland Bird Habitat
A step-by-step guide to executing a prescribed burn and common upland bird habitat management burn strategies
This is Part 3 of a three-part series on prescribed burning for upland birds.
In the first two articles of this three-part series, we discussed the benefits of prescribed fire and the tools necessary to conduct a prescribed burn. After identifying your objectives, preparing fire breaks, and assembling all the tools that will be needed, it’s finally time to execute the burn. This is where all the preparation and hard work pay off with improved habitat for the upland birds we all cherish.
In This Article:
- Prescribed burn pre-burn checklist
- Ideal wind speed, humidity, and weather for a prescribed burn
- PPE, fire break checks, and permits: the final steps before starting a prescribed burn
- Do you need a permit to conduct a prescribed burn?
- Prescribed burn crew briefing and burn boss responsibilities
- How to start a prescribed burn safely
- What is a ring-head fire?
- Alternative prescribed burn ignition techniques
- Mop up after a prescribed burn
- Post-prescribed burn debrief and evaluation
- When is the best time to conduct a prescribed burn for upland bird habitat?
- Why prescribed fire is important for upland bird habitat management
Steps to Conduct a Prescribed Burn for Wildlife Habitat
Conducting a prescribed burn for upland bird habitat involves several critical steps. This includes identifying burn objectives, preparing fire breaks, checking weather conditions such as wind speed and humidity, assembling trained crew members and equipment, completing a pre-burn checklist, conducting a test fire, igniting the burn unit using an appropriate ignition pattern such as a ring-head fire, and mopping up post-burn. Additionally, a post-burn evaluation and monitoring the unit during the following growing season will confirm that the fire met habitat management goals.
Prescribed Burn Pre-Burn Checklist
Whether it’s an actual printed checklist or just a mental list of things to consider, it’s important to make one last check of several items before lighting the match.
Questions that should be on your pre-burn checklist include:
- Are all the tools and vehicles on scene and in good operating order?
- How are the fuel levels in the ATVs/UTVs? Water unit motors? Leaf blowers? Chainsaws?
- Is extra fuel, including diesel, gas, and torch mix readily available?
- What’s the weather? Have you screenshotted the forecast or written down the conditions? What is the relative humidity and wind speed and direction?
- Do all crew members have the proper personal protective equipment (PPE), including Nomex or cotton clothing, leather boots and gloves, and eye protection?
- Have you taken one last tour around the burn unit to double check the fire breaks?
- Have you reported the burn to your local authorities?
- If required, do you have a permit to conduct the prescribed burn?
- Have you notified any neighbors about the fire and subsequent smoke?
It’s critical to start ATVs and water units to make sure they operate properly. Check fuel levels in the ATVs, water unit motors, leaf blowers, and chainsaws. Make sure there is extra fuel in case a refill is needed. Fill the drip torches and have some spare torch mix available. Additionally, check the weather one last time to make sure the conditions will result in fire behavior that will meet your objectives. It’s a good practice to screenshot the weather or write down the pertinent details. This information may help discern reasons why the burn met or failed to meet the objectives.
Ideal Wind Speed, Humidity, and Weather for a Prescribed Burn
Weather is a critical component for conducting successful prescribed burns. The vegetation absorbs humidity from the air and increases moisture within the plants. Low relative humidity can make a fire very difficult to control. On the contrary, high relative humidity may prevent the vegetation from burning at all or result in a poor burn where lots of thatch is left behind.
Humidity is typically lowest in the early to mid-afternoon, around 2:00 to 4:00 pm, and tends to increase as evening approaches. I typically tell landowners to burn when the relative humidity is 40 to 55 percent. Higher humidities can work if the wind is strong enough to help push the fire along. If the humidities are too low in the afternoon, a burn can be completed in the morning or evening when humidities are higher.
Wind is necessary to help push the fire and smoke in a predictable direction. Too much wind can result in embers being thrown long distances, potentially causing an escape. Try to avoid light and variable winds because as the wind switches directions, the flaming front will switch directions as well. This can result in a backing fire quickly turning into a running head fire (more on these terms later). I typically like a steady wind of 4 to 8 mph, but I will burn with more or less, depending on the humidity. The lower the humidity, the lower I want the wind speed. I typically tell landowners to never burn with more than a 12 mph wind.
PPE, Fire Break Check, and Permits: Final Steps Before Starting a Prescribed Burn
If friends or neighbors are helping burn on your property, make sure all the crew members have the proper clothing, gloves, leather boots, and eye protection that was discussed in “Prescribed Burn Equipment for Upland Bird Habitat Management.” It’s usually wise to take one last tour around the burn unit checking all the fire breaks. Limbs may have fallen or leaves blown onto the fire breaks since they were installed. If some crew members are not familiar with the area being burned, it never hurts to give them a tour of the unit as well.
When everything has been checked, the last thing to do is call the local authorities. Every county should have a non-emergency phone number you can call to reach the dispatch office. Do not call 911 as that is for emergencies only.
If smoke will carry from the fire toward any neighboring houses, it’s important to notify the homeowners. Open windows that result in a house full of smoke or clothes drying on a clothesline that get blanketed in smoke can result in quickly deteriorating neighbor relations. In fact, even if the smoke won’t impact your neighbors, it never hurts to let them know you plan to burn so they don’t get concerned when they see the smoke plume.
Do You Need a Permit to Conduct a Prescribed Burn?
Some states require a permit for prescribed burning. If that’s the case in your state, this will usually take some time; it isn’t a last-minute decision. In states where no permitting is required, it’s still important to make sure there are no burn bans in place. Some counties establish burn bans when the wildfire risk is high due to drought or other environmental factors. Contact your county or federal public land management office to learn whether your area has a burn ban in place.
Prescribed Burn Crew Briefing and Burn Boss Responsibilities
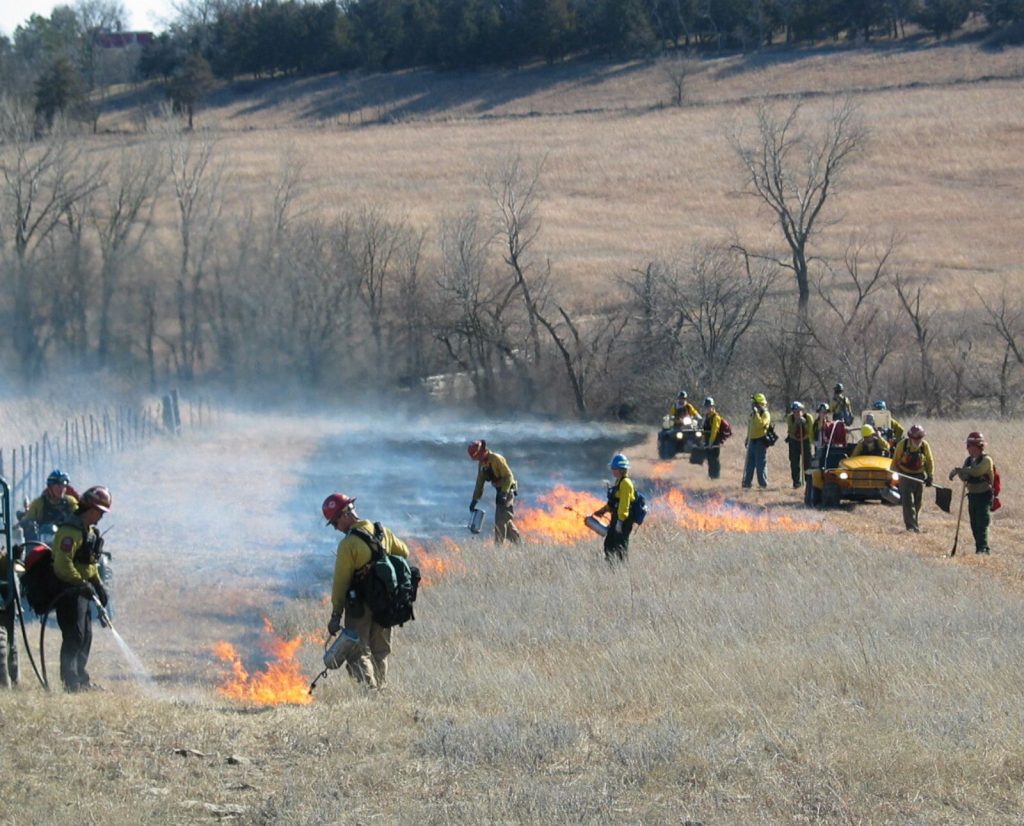
Once everything is deemed ready, the next step is to gather the crew for a briefing. There needs to be a designated burn boss for every prescribed burn. This may or may not be the landowner, as the burn boss is usually the most experienced fire practitioner amongst the crew. The burn boss should use an aerial map to explain how the ignition sequence will progress around the unit. If it’s a large unit, having a paper map for each crew member is a good idea. That way, if there are questions during the burn, they can refer to the map. Another option is using onX or various other apps for mapping needs.
It’s important to explain any hazards or potential problem spots associated with the burn unit. Identifying places to stop lighting and check in with the crew members on the other side of the unit is sometimes necessary. This is a common practice at corners, allowing them to burn out enough so there is adequate black, or burn areas, before continuing ignitions.
Each crew member needs to be given a task, and everyone should have some type of tool. Typically, there will be someone on each side of the burn unit lighting fire. Depending on the size of the burn unit, there will likely be someone on each side of the burn unit following behind the igniter and acting as a holding crew member. Holding crew members will have a water unit, leaf blower, a leaf rake, or some other type of tool to help extinguish flames that try to crawl across the fire break or, worse yet, an escape. An escape is when flames arise across the fire break from an ember that flies across the line.
If an escape occurs, check walkie talkies or phone apps to make sure crew members can all communicate. The ability to contain an escape can go from easy to impossible in just a few seconds, so communication is critical to get help from other crew members when an escape happens.
How to Start a Prescribed Burn Safely
Whether burning with a two-person crew or a ten-person crew, the vast majority of the time there will be crew members working in opposite directions. I mentioned a two-person crew rather than burning alone for a reason. No one should ever conduct a prescribed burn alone as you never know what might happen. I often say, “Plan for the worst, hope for the best” when I am leading fire crews. If you are operating alone and roll an ATV and get trapped beneath or have a medical emergency that causes unconsciousness and there is an active fire burning around you, the result could be catastrophic. These examples aren’t intended to scare anyone, but having at least one other person present could be the difference between life and death in an emergency.
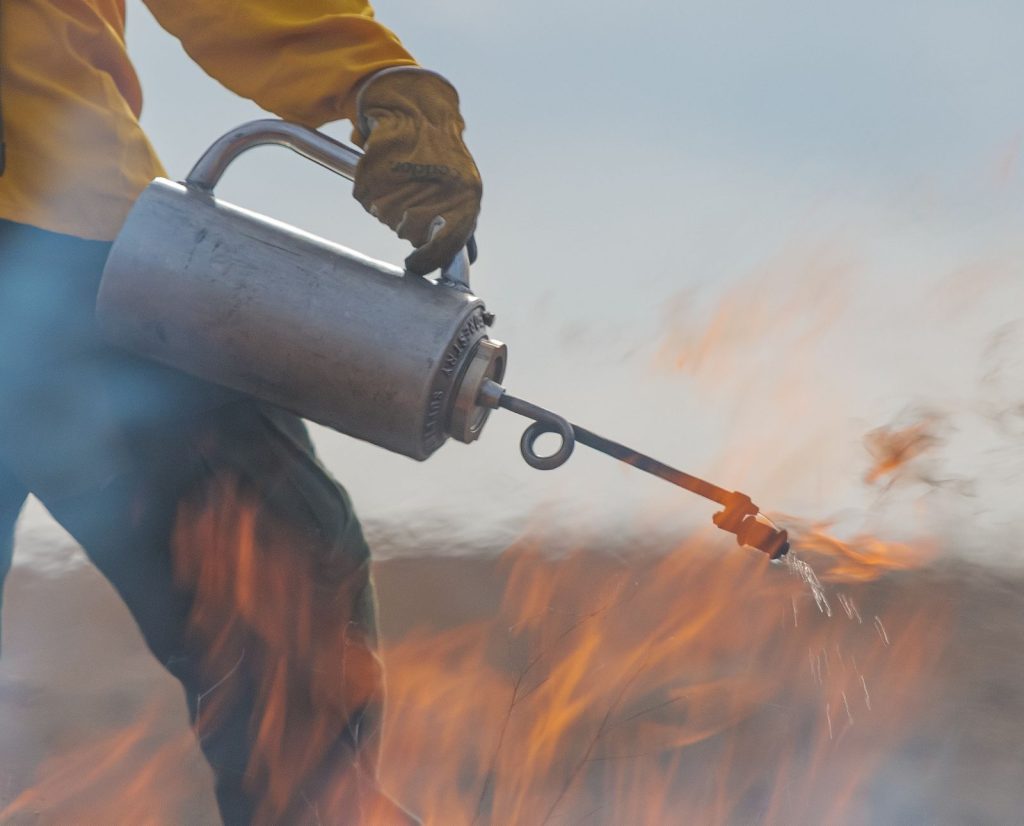
A test fire should be lit at the starting point, which in most cases is on the downwind edge of the burn unit. By lighting a test fire, crew members can watch the intensity of the fire and get an idea of the expected speed of the fire spread. It’s also an opportunity to observe the smoke and make sure it’s going the desired direction and attaining adequate lift into the atmosphere to reduce impacts to neighboring roads or houses. If the test fire causes concern, the crew can extinguish the flames and wait for a better day. But if the test fire proves satisfactory, the crew can proceed with ignitions.
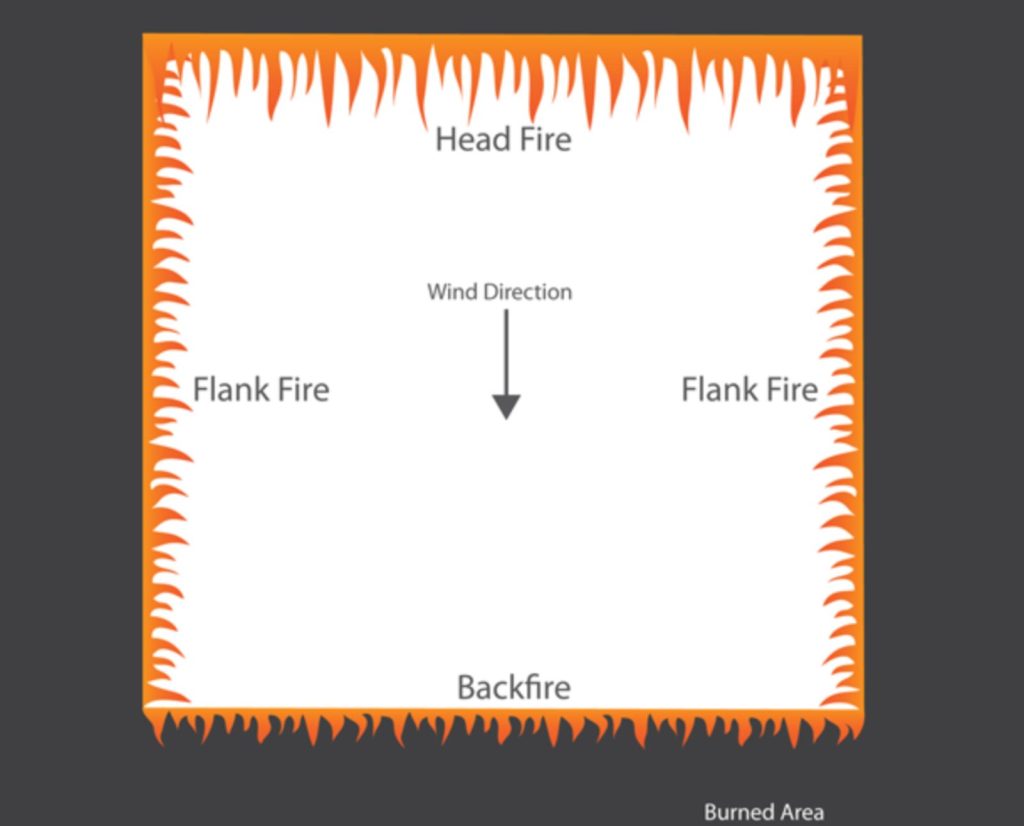
What Is a Ring-Head Fire in Prescribed Burning?
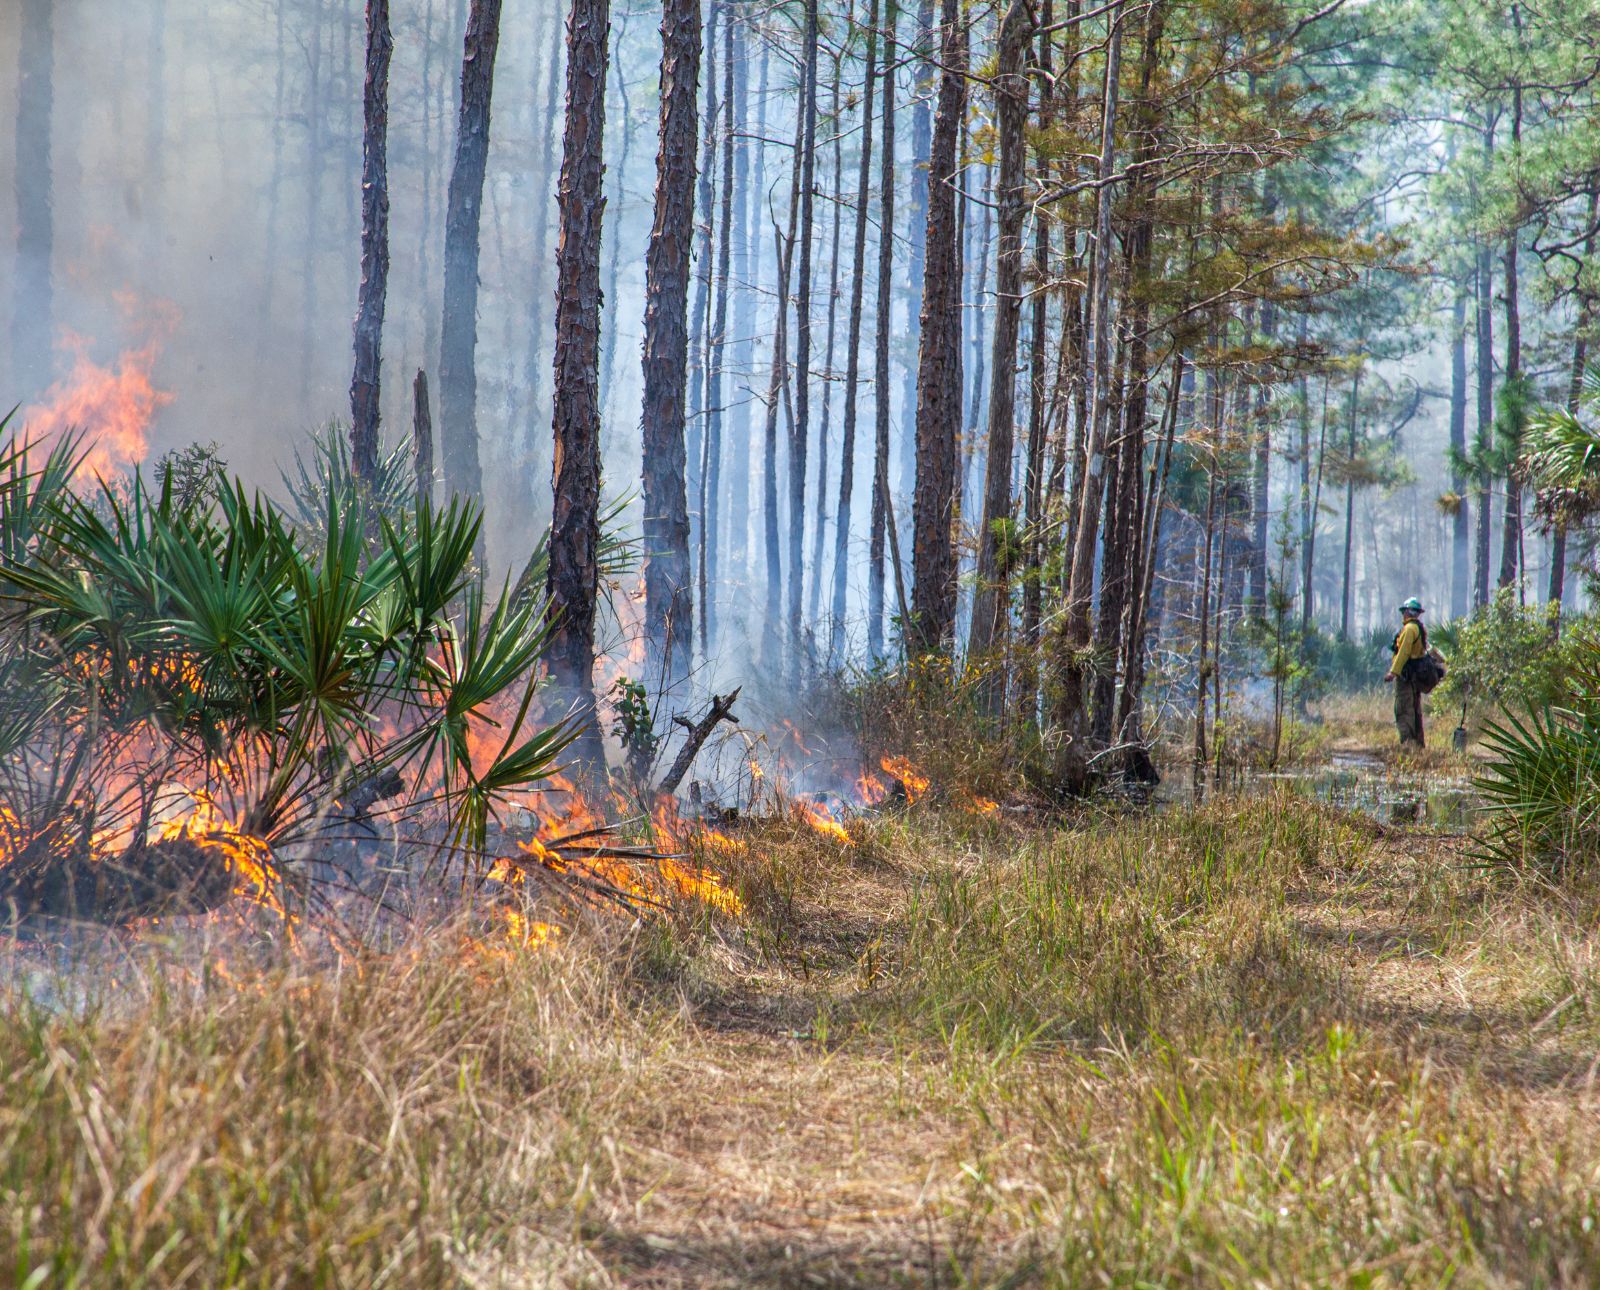
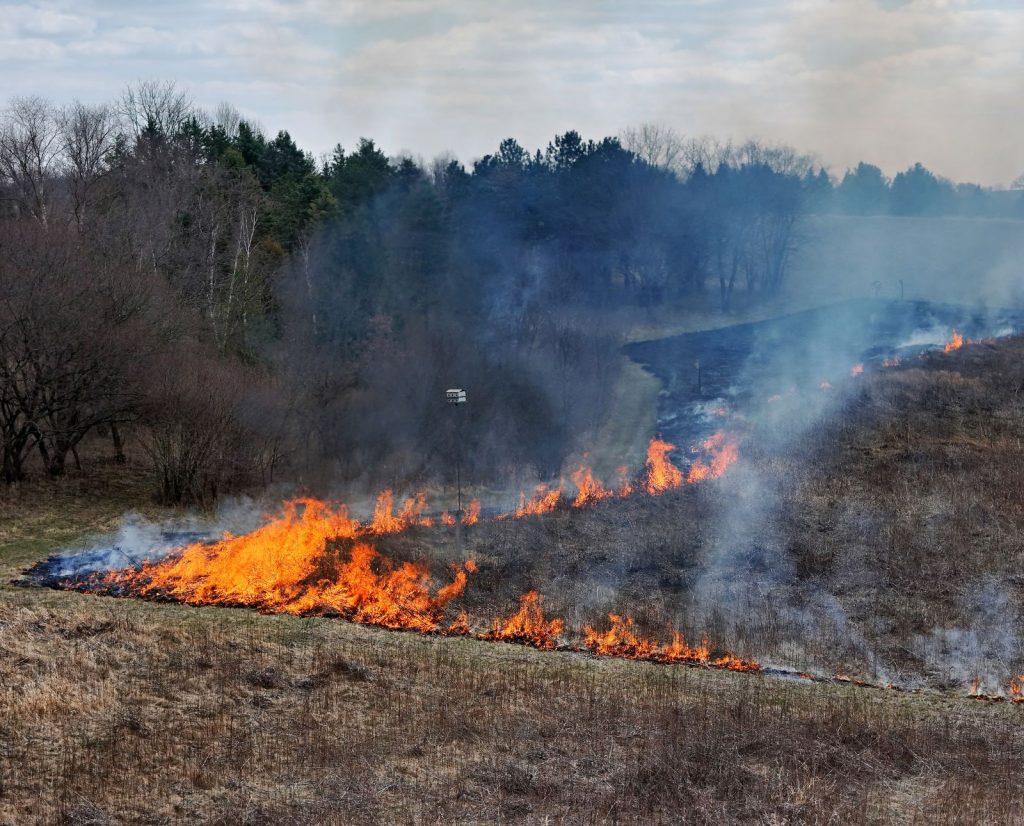
The most typical ignition pattern is a ring-head fire. This is where crews start on the downwind side, lighting what is known as the backfire. The backfire is backing into the vegetation, against the wind. The flame lengths are short compared to the other forthcoming fire edges. At the same time, the wind is trying to push the flames across the fire break. If the break is down to bare mineral soil, then the flames have no way to crawl across, and they go out when all the vegetation is consumed. However, crew members must watch for embers being blown across the line and landing in receptive vegetation on the other side. If the fire break is a mowed line, then most likely the holding crew members will need to actively extinguish the fire trying to crawl across the line since the wind will be pushing the flames.
Each igniter heads in opposite directions with their holding crew following behind. The backing fire will continue to back into the wind, creating black between the fire break and the backing fire itself. The width of black needed will depend on the vegetation height, wind speed, and humidity. This backfire line will eventually have a head fire slam into it as the igniters progress around the entire unit. The taller the grass, higher the wind speed, or lower the humidity, the wider the black needs to be to prevent a head fire from throwing embers across the fire break.
Most burn units will have corners where the backfire line ends, and the igniters begin lighting directly into the wind. This fire line is called the flank. The wind direction will create a situation where the fire moves more rapidly than it did on the backfire line and the flame lengths will be longer. As mentioned previously, these corners are important places to pause and check with crew members on the opposite side of the burn to make sure everyone is progressing at the same pace as corners can be likely places for escapes. The black will be widest where ignitions began and will be the narrowest at the corner the crew just reached. Sometimes it’s necessary to pause and allow the corner to burn out and increase the width of the black. Once the backfire line is deemed safe and secure, ignitions can proceed up each flank.
After lighting each flank, the igniters will reach the head fire line. Again, it’s important to pause and ensure the black along each flank is adequate to withstand the head fire flame front that will soon be on its way. Throughout the ignition process, holding crew members need to periodically check back along the fire break edges, all the way back to where ignitions began, just to make sure nothing has flared up where it doesn’t belong.
If the flank and backfire edges have plenty of black, the head fire can be lit. The head fire will have the longest flame lengths, and the fire front will move faster than the flank or backfire. Each igniter will light towards each other, eventually meeting near the middle of this line. The head fire will usually rush across the unit and should pull the flank fires in toward the middle of the unit. Once the igniters have met, the holding crews can keep checking all the lines while the middle of the unit burns out.
Alternative Prescribed Burn Ignition Techniques
Not all prescribed burns have to be ring-head fires. In some cases, as discussed in Part I of this series, it may be desirable to have a slow-moving fire that increases the heat retention at the base of unwanted woody invasion. This could be achieved by allowing the backfire to slowly burn the entire unit. Instead of lighting the flank and head fire lines, the crew just nurses the edge of the fire along where it touches the flank lines. This process takes a lot longer to complete, but the results can be significantly different than sending a quick moving head fire across the burn unit.
Mop Up After a Prescribed Burn
Once the fire front has consumed all the vegetation and the flames have burned out, it’s time to complete some mop up.
Crew members need to check any smoldering areas near the edges of fire breaks. Determining how wide to mop up the edge depends on the forecast for the remainder of the day, and possibly subsequent days. If the winds are supposed to increase, the mop up effort needs to be more intensive, extinguishing or moving any smoldering items deeper into the black. Logs, limbs, and manure can burn for hours or even days, so it’s important to check the weather for the following days.
Logs and limbs can be carried deeper into the black so they no longer pose a threat along the edge. Cow pies and horse manure will burn for hours and can cause issues by throwing a spark across the fire break when a gust of wind hits long after everyone has gone home. It takes a lot of water to extinguish manure so it’s usually best to move those deposits further interior. Any standing snags that pose a threat near the edge of the burn unit should be cut down to reduce their potential to throw embers. If downed logs are only partially burning, the burning end can be cut off and moved interior, rather than trying to move the entire log. A tractor with a bucket can be handy for pushing logs and limbs further into the black as well. The burn boss should make one last loop around the entire unit and personally determine if everything is adequately mopped up.
Post-Prescribed Burn Debrief and Evaluation
After the mop up is complete, it’s time to assemble the crew again for an after-action review. This is an opportunity to discuss how the burn went, point out any problems encountered, and propose options for improvement next time the unit is burned. Feedback is important to learn and improve, so it’s critical that all crew members speak up and participate in these reviews.
Evaluating the results of the burn is a necessary step to ensure the objectives were met. The unit should be monitored multiple times during the following growing season. For example, if the burn was completed in an attempt to improve brood-rearing habitat, it’s important to make observations about the forb response and the amount of bare ground. Does the bare ground last all summer, or does the grass fill in by August? Are the forbs annual or perennial plants, or a mix of both? Is there a diversity of insects on the forbs? These are critical questions that can help identify if the burn was successful.
All this information should be documented so future burns can either be completed to mirror a successful burn by burning during similar timing and conditions. Alternatively, if the objectives were not met, adjustments can be made for future burns to get different results.
When Is the Best Time to Conduct a Prescribed Burn for Upland Bird Habitat?
The best time to conduct a prescribed burn varies depending on your upland bird habitat management goals. You may be looking to reduce woody encroachment or decrease the amount of non-native grasses in your burn unit. Here are a few common fire and herbicide treatment recommendations we often prescribe to benefit upland birds:
- Create brood habitat in thick, rank warm season grass: this is used for many species of upland birds. Burning in late summer, fall, winter, or very late spring will reduce grass and increase forbs. Any firing technique will work.
- Create thick winter cover of warm season grass: this is often used for pheasant habitat. Burn a ring-head fire in areas near food plots in mid-spring when new growth of warm season grasses is 1-3 inches tall.
- Remove cedar encroachment: this is used for prairie grouse management, but can occur in a variety of other areas. Burn a ring-head fire in winter or spring. The taller the cedars, the longer the flame lengths are needed to consume the cedars’ crowns.
- Reduce hardwood or excessive shrub encroachment in old fields: this is used for many species, particularly bobwhite quail, to maintain old fields for year-round cover, including nesting, brood-rearing, and winter cover. Burn in late summer, fall, or spring when trees and shrubs are actively growing. When possible, burn with a backing fire to increase heat retention time at the base of the woody encroachment.
- Reducing amounts of non-native cool season grasses in open fields: burn a ring-head fire in early spring or fall. Then, spray out the non-native cool season when new growth reaches 4-6 inches tall. This will release the growth of native grasses and forbs that have been suppressed.
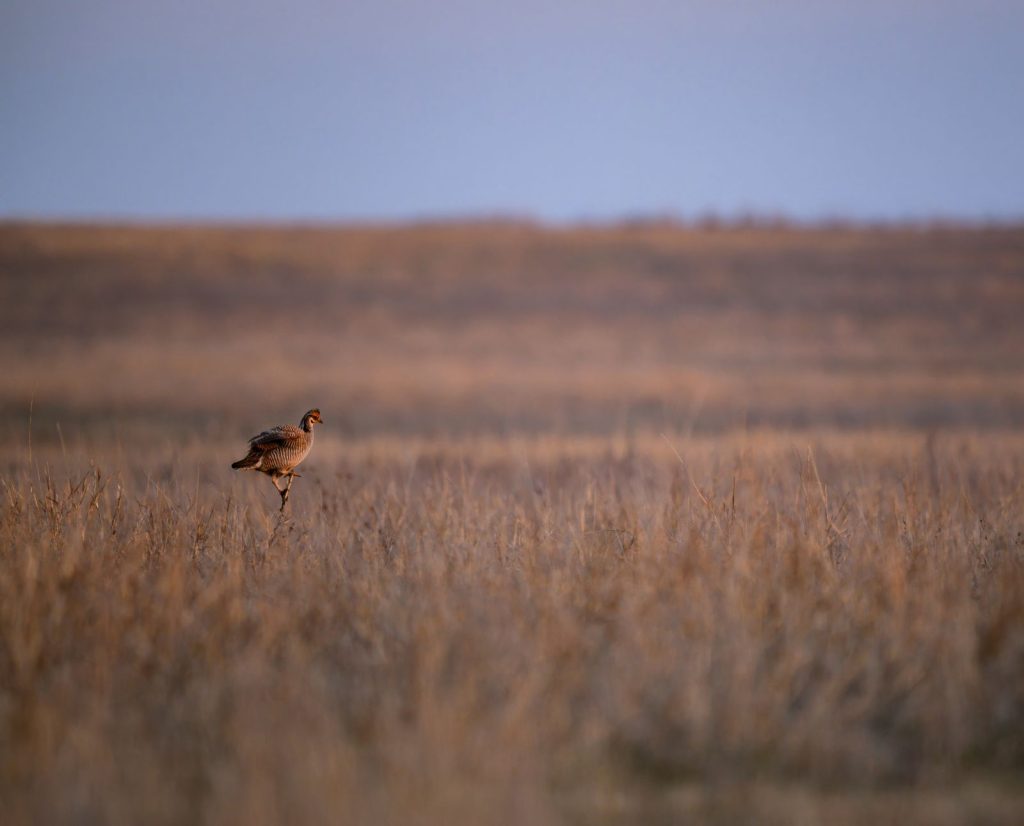
Why Prescribed Fire Is Important for Upland Bird Habitat Management
For some species of upland birds, fire is a necessity to effectively maximize populations. For landowners or managers who are unfamiliar with using prescribed fire, many state wildlife agencies offer burn workshops to help educate folks and get more fire on the landscape. Some of these agencies can even prepare a burn plan for you or enroll the land in a cost share program where you actually get some funding to conduct a prescribed burn, since it’s improving wildlife habitat. Hiring a burn contractor is another option for those who don’t want to attempt to complete a prescribed burn themselves.
Regardless of your path, finding a way to integrate fire into your management plans can significantly improve your upland bird populations. Whether the goal is improving brood habitat, reducing excessive woody encroachment, improving winter habitat, or simply restoring a natural process to the land, fire has a role in most ecosystems. Take time to learn, ease into the process, then enjoy the crackle and pop of the flame front, knowing the birds we all love will appreciate the effort.